Architecture means Autocad, Revit, maybe even 3DsMax. Why should we make time to learn Adobe programs? Aren’t some basic Photoshop skills enough?
If that’s genuinely how you see it, you’ll want to keep reading.
Adobe programs are hiding in almost everything we produce. Diagrams, Renders, Presentations, Portfolios, Competition boards, and the list goes on. The problem is that most of us pick these tools up by accident, as an afterthought, probably through trial and error. What we don’t realise is that no matter how strong our design is, if the presentation is unreadable, cluttered, or visually flat, the work suffers for it. You can create a great design and a detailed 3D model, but still present or visualize it poorly. Adobe programs are what stand between a good design and a presentation that actually does it justice.
But before we dive into the details of each tool, we need to take a step back. In this article, we’ll look at all three programs together; Photoshop, Illustrator, and InDesign. Understanding what makes each one different, what it’s actually built for, and most importantly, when to use which.
Understanding the Big Picture
Let’s set a rule that we’ll carry for the rest of this blog, and honestly, through your entire architecture career: Adobe Programs are not interchangeable, they are a workflow.
What does that mean exactly?
The short answer: each program is built for a specific purpose. Use the wrong one for the wrong job and you’re not just working inefficiently, you’re actively limiting the quality of your output. If you’ve been post-producing your renders, cleaning up drawings, and assembling your entire presentation all inside Photoshop, we have some news for you.
Now for the long, very important answer:
To truly understand how these three programs work together, you need to know two things about each one: what it is, and what it’s used for. Here’s the overview:
Adobe Photoshop
What it is: Raster / Pixel editor.
What it’s used for: Post-production for Renders, Image editing, Mood boards.
Adobe Illustrator
What it is: Vector editor.
What it’s used for: Line work, Diagrams, Icons, Scalable graphics.
Adobe InDesign
What it is: Layout / Publishing tool.
What it’s used for: Portfolio, Presentation boards, Booklets.
These three lines are the foundation. Everything else in this article builds on them.
Raster (Photoshop) vs Vector (Illustrator)
You’ll notice that Photoshop is described as a raster editor, and Illustrator as a vector editor. Understanding the difference will change how you think about both programs forever.
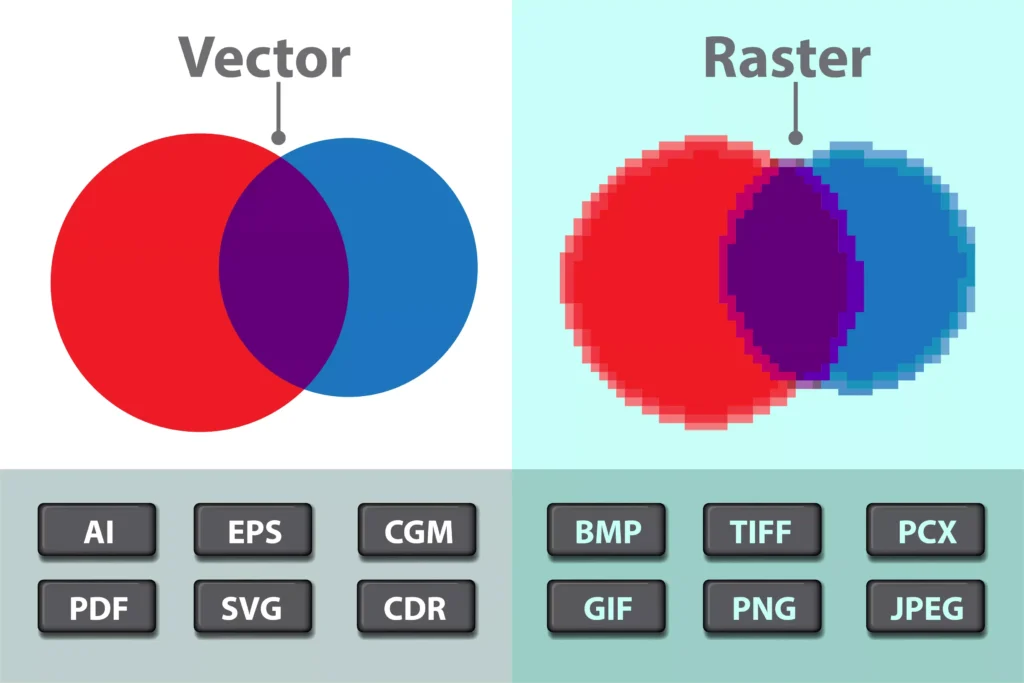
Raster images are made up of pixels; tiny squares of colour that together form a picture. Every photo you’ve ever taken, every render you’ve ever exported, is a raster image.
The catch? They’re resolution-dependent. Zoom in far enough on any raster image and it starts to blur and break apart. This is why a render that looks sharp on your screen can come out fuzzy when printed; the resolution wasn’t high enough to begin with.
Vector graphics work completely differently. Instead of pixels, they’re built from mathematical lines and shapes. This means they’re infinitely scalable, you can stretch a vector graphic to the size of a billboard and it will be just as crisp as it was at thumbnail size. No blur, no loss of quality.
This is exactly where the “Photoshop for everything” problem begins. When you take a vector line drawing exported from AutoCAD or Revit and bring it into Photoshop, you’re forcing a vector file into a raster environment. The moment that happens, your clean sharp lines are converted into pixels, and once that conversion happens, there’s no going back. You lose scalability, you lose crispness, and as a bonus, you’re now working with a file that’s bloated, heavy, and slow both in Photoshop itself and during the printing process which takes forever.
So to put it simply: Photoshop handles your images, Illustrator handles your drawings and graphics. As architects, you’ll work with both constantly. It’s just a matter of which program to choose for which output.
Now, once you have all of that work ready, you need somewhere to bring it all together. That’s where InDesign comes in.
InDesign – Your (Soon to be) Favourite Tool!
This is my personal favourite part in the entire process! How satisfying it is to see all your work finally coming together neatly, which essentially means that we’re almost done & can have a good night’s sleep.
I’m kidding, of course. However, layouting on Indesign is truly satisfying especially because it’s literally built for it, specifically for layouting & publishing; arranging text, images, and graphics into a final document.
What makes InDesign different is that it thinks in documents, not just files. It works with master pages, which let you set up a consistent structure; margins, page numbers, headers once, and have it apply across every single page automatically. It uses text and image frames, paragraph styles, and document-wide settings that ensure everything stays visually consistent from the first page to the last. For a 30-page portfolio or a multi-board competition submission, that consistency beyond aesthetic & past professionalism. Essentially, any time your work needs to live inside a multi-page document that will be read, judged, or submitted, InDesign is the right tool.
The most common way we use InDesign is at the very end of the workflow; everything is ready, and InDesign is where it all gets compiled. But here’s a perspective worth considering: InDesign can actually be one of the first tools you open, not the last.
Starting your project by roughing out your layout in InDesign, before a single render is produced or a diagram is drawn, is one of the most underrated moves in architecture presentation. Setting up your board layout early forces you to ask the right questions: What drawings do I actually need? What size should each diagram be? What render ratios work best for this composition? Answering those questions at the start, rather than the end, means every file you produce in Photoshop and Illustrator is made with a clear purpose and a defined destination. No resizing renders at midnight because they don’t fit the board. No realising a key diagram is missing an hour before submission.
The Ultimate Adobe Workflow
So far we understood each program individually and learned what goes into which. You brainstorm your presentation layout in Indesign, start exporting your renders & they go straight into Photoshop; you adjust the lighting, maybe replace the sky, and bring the images to life. Meanwhile, your floor plans and sections are exported as vector files and brought into Illustrator, where you style the linework, add colour fills, bubble annotations, and produce your diagrams. Once both are ready, everything, the post-produced renders, the diagrams, the text, the project title, gets assembled back in InDesign, where you lay it all out into a clean, consistent, professional board.
Perfect, now for the last but most mindblowing part. What makes this workflow even more powerful is that Adobe didn’t just build three separate tools, they built three tools that are designed to talk to each other.
A few features that takes it to the next level:
Linked files in InDesign Instead of embedding a Photoshop or Illustrator file into InDesign, you link it. Embedding drops a static copy into your document, it’s disconnected from the original the moment it’s placed. Linking, on the other hand, keeps a live connection to the source file. Update the render in Photoshop or tweak a diagram in Illustrator, hit save, and InDesign automatically flags the change and refreshes the placed file across your entire document. If you override a pdf, all you have to do is click relink!
Smart Objects in Photoshop When you place an Illustrator file into Photoshop as a Smart Object, the vector data is preserved inside it. You can scale it up or down without any loss of quality, and double-clicking it opens the original Illustrator file directly for editing. The two programs essentially hand off to each other without breaking the quality of either.
Copy-Paste between Illustrator and Photoshop You can copy vector paths directly from Illustrator and paste them into Photoshop, choosing to keep them as vector shape layers. This is particularly useful when you want crisp linework sitting on top of a raster render without any pixelation.
Shared colour systems All three programs support the same colour models; RGB, CMYK, and Pantone. This means the colours you define in Illustrator will match exactly when placed into InDesign or referenced in Photoshop, keeping your visual identity consistent across the entire document.
Adobe Fonts Any font activated through Adobe Creative Cloud is instantly available across all three programs simultaneously. No downloading, no compatibility issues, what you set in InDesign is available the moment you open Illustrator or Photoshop.
Congrats, You’re Now an Adobe Master!